Lemon and Courgette Muffins

So, using vegetables in baking and making delicious cakes, muffins, cupcakes and so on has become more and more popular. One of our favourite cafés in Oxford, Missing Bean, serves this amazing lime and courgette cake. Another time, I had a spinach cake with a friend at l’ETO café and then I tried to make some sweet potato brownies (I am still working on that- hopefully I will be able to post something about this soon). So, I thought now that it is summer and it has gotten a bit warmer (well for a couple of weeks at least) I would like a refreshing cake, but maybe something else than lemon drizzle cake. And so I decided to investigate a recipe for lemon and courgette muffins. I was quite a big fan of it when I tried it at Missing Bean. The muffins stay moist for a longer time, and are quite refreshing and not too sweet. They are also dairy free! I would recommend to let them sit for a day, as on the second day, they were even better (in my opinion at least).

Preparation: 25 minutes
Baking time: 20 minutes
Difficulty level: simple

Ingredients:
400 g courgettes, grated
3 eggs
200 g sugar
200 g flour
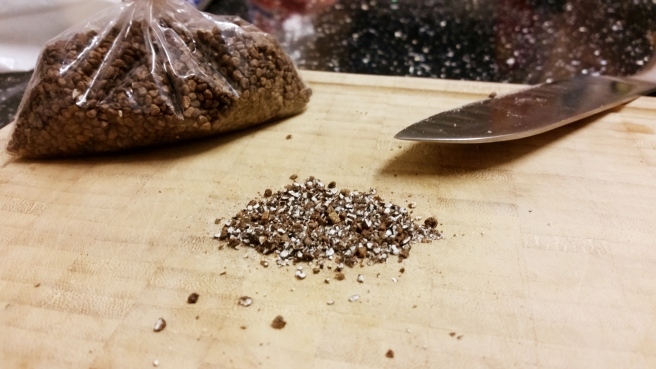
100 g almonds, finely grated

3 tsp baking powder
3 lemons, zest and juice
300 g icing sugar

Pre-heat the oven to 180 °C.
For the cake, wash the courgettes well and then grate them. I picked the medium sized grating (running the risk of maybe having too big junks but that didn’t happen). Grating the courgette too small would create the potential of the courgette to just lump up rather than evenly distribute across in the batter. (You should probably know that I was at a workshop about heterogenous catalysis and there were many talks about particle sizes so pardon my slightly scientific language).


Add the almonds to the courgettes, allowing it to sweep up some of the water.

Then mix the sugar and the three eggs together. The best result for fluffiness is to mix until you have a layer of foam and bubbles which means you’ve beaten quite a bit of air in.


Then add the courgettes-almond mixture and fold it in.
2016-06-12 14_Fotor5

The next step is to add the flour and baking powder as well as the zest of three lemons (if you grate the zest yourself, make sure you use organic lemons so that they haven’t been sprayed – and even then I still wash them with hot water).

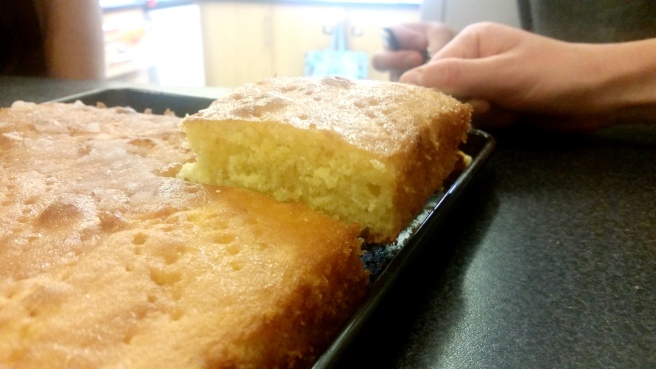
Now it is time to bake. You can make a 26 cm diameter cake out of this batter or you make about 20 to 24 muffins.
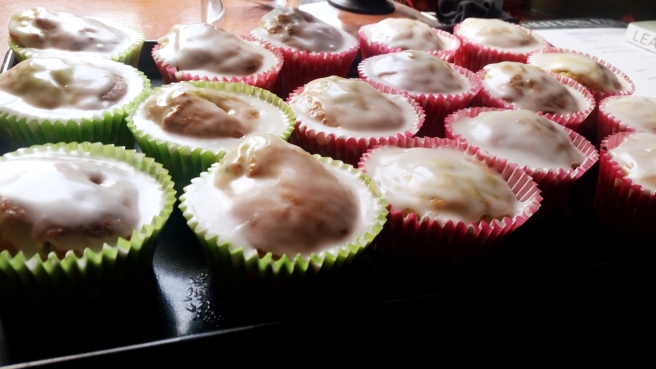
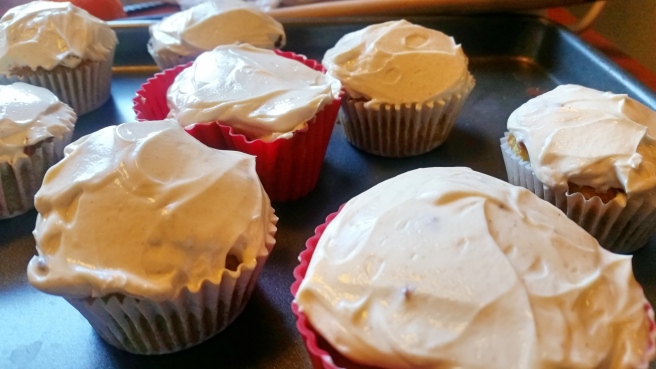
Bake the muffins for about 20 minutes and the cake for about 40 minutes, until the cake/muffins is/are golden brown on top, just like the ones in the picture below.

2016-06-12 15_Fotor8
Let them completely cool. Now use the lemon juice of the three lemons and add to the icing sugar. Make sure you add them in small amounts, as depending on how juicy your lemons were, you might need a little bit less juice to get a good consistency of the icing sugar.

Now top the muffins with the icing sugar mixture and let it harden. As I said before, if you want, leave them standing for a day (preferentially in a cool place but not necessarily fridge- like a cold cellar) and then serve them! They will be well received, I promised- that’s based on a survey I conducted when I handed them out ;-).
2016-06-12 15_Fotor9

Lemon Drizzle Cake

Today’s recipe is a Lemon Drizzle cake. I am not sure why, but we recently (and by we I mean our little friends group in college) have become obsessed with lemon drizzle cake. Especially in this weird weather, where it is super humid and warm and then suddenly rains and all, lemon drizzle cake is perfect. It is refreshing (more refreshing than chocolate- I am sad to admit) and as it doesn’t contain cream and all it will survive a warmer summer day without being constantly refrigerated – and let’s be honest- it is just a very yummy (and super easy) cake!

Preparation time: 20 minutes
Baking time: 25-30 minutes
Difficulty level: simple

Ingredients:

250 g butter
250 g sugar
325 g flour
2 tsp baking powder
4 eggs
50 mL milk
finley grated rind of 2 to 3 lemons (depending on the size of your lemons)

The recipe is a Mary Berry’s original however, I have changed the quantities slightly and added more lemon (I really like my cake to be very lemon-y). Also I changed the baking time to slightly less than what she says simply because that made my cake more fluffy and even more enjoyable to eat.

Preheat the oven to 180 °C.

The preparation of the cake is super easy and what I like to call a ‘one-pot’ reactions (you won’t believe how much chemists appreciate a one pot reaction!). So for the ‘one-pot’ reaction, the most straight forward thing to do is to measure out all ingredients into one bowl and mix them all together. However, that can sometimes produce those annoying lumps and make the cake slightly less fluffy so I optimised the procedure a little.

So measure out the butter and sugar in a bowl and mix until well combined and fluffy. Then add the eggs (you can add all at one time) and blend together until you see little bubbles forming.


Add the flour, baking powder, salt. And last add the milk and the lemon rind. This is now no longer a one pot reaction but as I said, it improves the fluffiness of the cake so I would give it a try and it only takes slightly longer.

Now transfer the batter into a cake tin- I normally use a rectangular baking tray for this.

2016-05-30 12_Fotor8

And bake for 25 to 30 minutes at 180 °C.

While the cake bakes, take 4 lemons and squeeze out as much lemon juice as possible! Then add about 150 g sugar and mix well.

Once the cake is done (best is to take it out when the sponge is quite springy and bounces back when you press carefully on it), take a fork and poke holes into the cake- this will allow you the optimum distribution of lemon juice.

2016-05-30 13_Fotor9
Then pour the lemon-sugar mixture all over the cake, make sure to completely cover it. Once it has dried, you can cover it with a thin layer of icing sugar to hide the holes away.

Now sit down and enjoy!!
2016-05-30 14_Fotor10

Chewy double chocolate cookies

20160522_181813_Fotor

Life has been crazy recently! Labs have just taken over my life slightly and then also there is sun. As soon as the sun is out all I want to do in my free time (except for baking obviously) is be outside, go for strolls around the park, go for a nice cold pint in a pub and eat as much ice cream as I can. Even though I kept on baking over the last couple of weeks, I just didn’t have the time to blog about it.

2 weeks ago, a friend and I baked for the Garden Party of our college in Oxford. We spend 2 nights and 1 morning in the kitchen baking, with always fun company, some banging 90s tunes and were surprisingly little stressed considering the amount of baking we did (check out those pictures of the baking).


But now I am back with a new blog post for ya! Last weekend, I really wanted some cookies- and rather than walking all the way to Tesco to buy some, I had all the ingredients I needed to make some chewy (and soft at the same time) double chocolate cookies. The cookies are super chocolatey and go very well with ice cream (especially on a warm summer day- just saying). And on top of that they are also very easy to make and not a lot of time effort (even better for a sunny day).

Preparing time: 15 minutes and 30 minutes chilling
Baking time: 12 minutes
Difficulty level: simple

Ingredients
250 g Butter
250 g white sugar
2 eggs
125 g cocoa powder
215 g flour
2 tsp. baking powder
150 g milk chocolate, cut into chunks
1 tsp. vanilla
pinch of salt

Mix the butter and sugar together until creamy. If you just gotten the butter out of the fridge, put it in the microwave for a couple of seconds to make your life easier. Then add the vanilla extract and salt. Add the eggs one by one and mix until you can see air bubbles forming.

In a separate bowl, weigh out the flour, baking powder and cocoa powder. Add slowly to the butter mixture and mix carefully (if you turn on the mixer too high you will basically flour your whole kitchen- and who wants to clean that up right?!).

So once you added the flour mixture, chop the chocolate into small pieces and add. Now just use a spatula to fold in those chocolate chunks. The dough now has become quite sticky and it won’t be easy to mix. If you feel like you can hardly mix it, then just add a bit of milk.

Now chill the dough for about 30 minutes and either go and lie in the sun or watch some Netflix and drink tea (totally dependent on the weather of course).

Preheat the oven to 180 °C and take the dough out of the fridge and place baking paper (or if you ran out of it just like I did, butter the baking tray). Now, using your hands, form small balls out of the cookie dough and place them on the tray.

20160522_180829_Fotor

Bake the cookies for 12 minutes, they will still be quite soft by the time you take them out but that is exactly what you want.

Now go, enjoy them either warm or cold, with ice cream or caramel sauce – maybe even chocolate sauce?!

Puff Pastry Apple Roses


2016-04-16 07_Fotor17

My mum’s birthday was coming up and we were thinking of what to bake. My mum isn’t that much of a sweet tooth and not the biggest cake supporter. She normally likes something light and easy to eat. I always wanted to try to make those apple roses (also they look very pretty) as I have seen them all over the internet and then thought this would be a great occasion. The puff pastry apple roses are great to bring to dinner parties, picnics in the park or just to the office as a little snack!

Preparation time: 30 minutes
Baking time: 30 minutes
Difficulty level: medium

Ingredients:

1 sheet of puff pastry
2 big apples
1 lemon
5 tbsp sugar
2 tsp cinnamon
1 tsp cloves
a pinch of salt

Wash the apples and do NOT peel them. Cut in half and take out the middle part and then cut slim slices (approximately about 5 mm thick but you do not need to measure it, just go with the flow really).


Then once cut, put in a big pot filled with water. Add the lemon juice and 2 tbsp sugar and bring the water to boil. To test when the apples are ready, you should take an apple slice out and see if you can easily bend it. Once the apples are done (it took about 10 minutes for me), take the slices out and put on kitchen roll and allow to cool them.

Mix the sugar, cinnamon and cloves well together. Then take the puff pastry (yes, I was too lazy to make this from scratch) and divide up into 7 slices.


Then take one part and add the sugar/cinnamon mixture. Now along the long side, align the apple slices along the edge (you can have them slightly overlapping).

Flip over the puff pastry onto the apples and roll up from the short edge and make sure you keep it tight.


Then place in a muffin tray (I used muffin cases but you can also just butter the form and put them straight in).
2016-04-15 10_Fotor14+
Bake for 30 minutes and then let completely cool. Once the apple roses are cool, cover them in icing sugar and you are good to go!

Hot Cross Buns

Untitled5

I know Easter has passed, but I asked a friend of mine to write a blog post about her making Hot Cross Buns. Hot Cross Buns are super popular in the UK for Easter and probably the thing that EVERYONE eats (I guess it is the equivalence to christmas pudding in importance). As I am not British and I have never made them before, when she told me she makes them every year I thought it would be great if she wrote a guest blog post. So I will post this now cause I really enjoyed reading her post and I will just re-post it next Easter ;-).

Here we go, this is Harriets post about the making of Hot Cross Buns. Enjoy!

In my family, we’ve always eaten hot cross buns for breakfast on Good Friday. A few years ago I decided to try making them myself, and it not being a complete disaster I’ve made them every year since. Despite being a big Mary Berry fan, I always use Delia Smith’s recipe. The only alteration is that I leave the buns to prove overnight, so that in the morning they are freshly baked for breakfast!

Preparation time: 30 minutes, 12 h resting
Baking time: 15-20 minutes
Difficulty level: simple

Ingredients:

450 g strong white flour
1 level tsp fine salt
4 level tsp. yeast
3 level tsp ground mixed spices
1 level tsp ground cinnamon
50 g golden caster sugar
110 g currants (I like pinhead)
50 g whole candied peel, chopped
50 g spreadable butter
150 ml hand-hot milk
75 ml hand-hot water
1 larger egg, beaten

For the crosses:
40 g plain flour
10 g spreadable butter

For the glace:
1 tbsp granulated sugar
2 tbsp water

To make the dough, first mix all of the dry ingredients together, and make a well in the centre. Then you can mix in the wet ingredients – I microwaved the butter so it was pretty much melted.

The next step is to leave the dough to rise, I left it overnight and in the morning it had about doubled in size, and was smelling good already!

Now pre-heat the oven to 180 °C. After dividing into 12 and leaving to rise again for about half an hour, it’s time to put the crosses on top. Before I made these I always wondered what they were made from – it’s actually a simple dough made from flour and water which is cut into strips. Then they are ready to go into the oven!

While the buns are in the oven, you can make the glaze by heating water together with granulated sugar. It’s important not to stir it, and that the sugar is completely dissolved to make a syrup – otherwise the sugar will recrystallize and make a white crust, which (speaking from experience) is not the most attractive look. Alternatively, you can use warmed up golden syrup, which is a bit easier. Brush the buns with the glaze while they are still hot, and once they’ve cooled down a little they will be ready to eat. Happy Easter!

Untitled5.png


Bread Cones

2016-03-27 11_Fotor5
I was recently just browsing Instagram and I saw this picture of a stuffed bread cone topped with parsley so it would look like a carrot. And that was probably as it was just before easter! So I thought, why not make these bread cones. They look super cool and surely would be delicious especially if they were filled with some sort of cheese no? Sadly, I couldn’t go home this Easter because of work, so everyone who stayed from the lab group decided to have a big Easter sunday brunch. What better to bring than some stuffed bread cones, riiiiight?

So I investigated further and found the perfect recipe on Home Cooking Adventure. Ella has had her blog since 2011 and she also does incredible useful videos that help explain how to do things, just like bread cones. So I, as usual, have pictures of how to do it but if you need further help, totally go and check out her blog! (Also please apologise the pictures, it is difficult to bake and take pictures at the same time)

So let’s get started

Preparation time: 30 minutes, 1.5 h for rising
Cooking time: 15 minutes
Difficulty level: medium

Ingredients

500 g flour
1 tsp salt
25 g sugar
50 mL warm water
7 g activated dry yeast
170 mL milk
2 eggs
60 g butter
seeds for topping such as poppy or sesame seeds

Filling
300 g cream cheese
300 g feta cheese
any herbs and spices you fancy: I use chilli, cayenne pepper, salt, fresh basil and parsley

In a cup, put the warm water and add the yeast plus a teaspoon of sugar and put aside.
2016-03-25 15_Fotor
In the meanwhile you can measure out the flour, salt, sugar, milk, eggs and butter. See this recipe is super easy cause it is like a one pot ‘reaction’ (as we chemists like to refer to it) which just means you can do it all in one bowl and that’s it. So you add the activated yeast-water mixture and then knead.
2016-03-25 15_Fotor2
Use your hands (unless you have a super cool kitchen machine like kitchen aid which I don’t) and knead until it becomes a soft dough. Cover with a slight damp kitchen towel and let it rise until it doubled in size (try putting it close to your heating or put it in the sun or somewhere warm).

While the dough rises, you can make the cones (again that tutorial from Ella is very useful).
Put two pieces of A4 paper on top of each other. Then fold the piece of paper into half along the long side and start rolling up to get the cone shape (this took me several attempts to be honest). Measure out a piece of kitchen foil that is just about longer than the A4 paper sheet. Roll the kitchen foil around the paper cone and done is your cone template!
2016-03-25 16_Fotor4

2016-03-25 16_Fotor5
2016-03-25 16_Fotor7
2016-03-25 16_Fotor9
2016-03-25 16_Fotor10
2016-03-25 16_Fotor12

Once the dough has doubled in size, you can continue with the preparation of the actual bread cone.
Knead through the dough again, if it is very sticky add a bit more flour to it. Then divide up into 8 to 10 equal parts, depending on the thickness you want.
2016-03-25 17_Fotor13
Using your hands, stretch the dough into a long roll. Then place the bottom of the cone at the bottom of the long dough roll and slowly roll it up. Et voila the hardest part is done!


Now just use some milk or egg yolk (depending on the shade of orange/brown you want, I used only milk) and sprinkle with sesame seeds or any other seeds you fancy. Let rest again for 20 minutes. In this time you can preheat the oven to 180°C and then bake for 15 minutes.

The stuffing

Crumble up the feta cheese into small pieces. Add all the cream cheese and mix well. Now season it the way you want it: I used chilli, salt, pepper, fresh basil and fresh parsley to give a very nice and slightly salty (in contrast to the bread cones) stuffing.

Use a small spoon or knife to stuff and then you are ready!

Carrot-Cardamom-Banana Muffins

2016-03-25 07_Fotor5

With Easter just around the corner I thought of baking some sort of carrot cake. But rather than doing the traditional carrot cake, I thought of trying something new, especially focusing on cardamom. So I found this recipe on Anna Jones’s blog and thought it looked very delicious. So I went ahead and gave it a try, with a few adjustments to suit my taste.
The great thing about these muffins are that you do not use sugar, you just use a little maple syrup and banana to add sweetness of the muffin. Considering the amount of chocolate we all consume during Easter (and believe me, I always manage to eat a lot more chocolate than I should) it is nice to have a cake that is less sweet. You can also eat them for breakfast (I mean who doesn’t love eating muffins for breakfast (in bed) if it’s a bank holiday and you get time off work?). They don’t take very long either, however, I need to admit, that even though they taste incredible, the banana dominates the taste a little bit. So I would probably call them carrot-banana muffins. The other great aspect of the cake is that you do add cardamom as a spice. For me this meant a lot of cardamom (which I just love) and it really blends in with the carrot and banana taste. So let me get started.

Preparation time: 20 minutes
Baking time: 20 minutes
Difficulty level: simple

Ingredients:

80 g butter
4 Tbsp maple syrup
seeds from 6 cardamom pods
1.5 tsp cinnamon
½ tsp cloves
150 g ground almods
100 g flour
40 g chopped hazelnuts
2 tsp baking powder
a pinch of salt
4 medium carrots, grated
1 banana
3 eggs

Icing
200 g cream cheese
4 tbsp maple syrup
a pinch of cinnamon

Preheat the oven to 180 °C and prepare your muffin tin (or silica muffin cases) to be ready for later.

I normally have ground cardamom, but for some reason, I couldn’t find the grounded one but I still had the seeds. So as I don’t own a kitchen mortar and pestle (really I just have one in the lab or in Germany which doesn’t help when studying abroad), I just chopped the seeds as small as I could and then used them.

2016-03-24 18_Fotor
Chopped Cardamom seeds

Biting on a little cardamom seed is actually really nice and emphasises the flavour cardamom adds to the muffins. Put the butter, maple syrup, cinnamon, cloves and cardamom in a pan and melt. Leave to cool before adding it to the other ingredients.


Now grate the carrots (which could be seen as a workout considering how hard it is on your arms) and add the almonds, flour, salt, baking powder and chopped hazelnuts.


Add the pre-whisks eggs and the mashed banana. Now mix well (this will result in a rather dry dough for now). Then slowly add the butter-maple syrup mixture and mix well.
2016-03-24 19_Fotor7
Once everything is combined use an ice cream scooper and fill the muffin tin. Then bake for 25 minutes. Now leave to cool for several hours.
2016-03-24 20_Fotor8
To prepare the cream cheese icing, use several sheets of kitchen roll or a kitchen towel and squeeze out the liquid. This will leave you with a dense cream cheese. Add the maple syrup and cinnamon to the cream cheese and mix until the cream cheese went from a dense mixture to a light and fluffy one.


Spread on top of the muffins and they are ready to be served!

2016-03-25 07_Fotor4
Enjoy this little Easter treat!

Ferrero Rocher Cupcakes

2016-03-12 18_Fotor14

The other night, a friend and I were just drinking tea and eating Ferrero Rocher and then she asked me if I thought the filling of Ferrero Rocher is just Nutella. And the more of those chocolates I ate (and let’s just say that I ate loads) the more convinced I am that yes the filing is just Nutella. I mean it is the same company that produces Nutella and Ferrero Rocher so why wouldn’t they just make use of that? I love Nutella so I am not complaining but then we thought it would be easy to make Ferrero Rocher Cupcakes.
2016-03-12 12_Fotor

Last weekend, we decided to make those cupcakes from scratch. We thought that having a vanilla-hazelnut dough on the outside, a nutella-hazelnut surprise inside, and top it with Nutella icing and some chopped hazelnuts. Sounds promising, eh?

Preparation time: 30 minutes
Cooking time: 20 minutes
Difficulty level: simple

Ingredients:
4 eggs
450 g butter
250 g sugar
150 g flour
1.5 tsp. baking powder
100 g ground hazelnut
50 g icing sugar

450 g Nutella glass
16 Hazelnuts

The first thing you should do is to freeze the Nutella. Put a sheet of baking paper on a baking tray. Then use a teaspoon and drop a heaped teaspoon for of Nutella on the baking paper. Once you have done enough (this will give 16 cupcakes) put the Nutella in the freezer until you prepared the dough.

2016-03-12 12_Fotor2
Preheat the oven to 180 °C.

Now beat 250 g butter with the sugar and then add egg by egg.Then add the flour, baking powder and ground hazelnut in portions.


Now fill the cupcakes cases with a heaped tablespoon of dough. Take the Nutella out of the freezer and then place a frozen blob of Nutella on top of the dough (if you quickly put a little bit flour around the Nutella, it will be less likely to sink to the bottom).

2016-03-12 12_Fotor6
Then add the hazelnut on top and cover again with another tablespoon full of dough.

Put in the oven and bake for about 20 minutes, until little dough is stuck to the cake tester. Take the cupcakes out and allow to completely cool.

2016-03-12 17_Fotor10

For the icing, use 200 g butter and 50 g icing sugar. Mix it well together until the butter is fluffy and then add about 250 g of Nutella. Now using a knife or icing finger, spread generously on top of the cupcakes and sprinkle with some chopped hazelnuts.


I hope you enjoy our interpretation of making a Ferrero Rocher Cupcake.

2016-03-14 15_Fotor15

Donauwelle

2016-03-11 06_Fotor16

Donauwelle is a German cake, originated from the black forest and it is one of my favourite German cake. Donauwelle translated means Danube wave and the name is due to the shape of the cake thanks to the addition of cherries. So let me explain what it is made of. You start off with vanilla dough, top that with chocolate dough and then put in some cherries. Baking it all together will cause the cherries to sink into the dough and creating a wave pattern. You then top it with German buttercream (slightly different to British and in my option a bit better cause it is creamy for cakes like this, for cupcakes I would still use British buttercream) and chocolate. Me and a friend from labs, the same person who taught me how to make the impossible flan, were quite keen on making this. She is going to Mexico for a month and wanted to learn a German cake, so we took this opportunity to bake some Donauwelle together. The next day, we took the cake to labs. It was a whole tray full for about 15 people, everyone really enjoyed it and ate one piece. Then I just left the cake in the common area and when I got back about 20 minutes later, the rest of the cake has disappeared except for the last piece (for some reason no one ever eats the last piece).
The recipe today is from my grandma. My grandma is amazing at baking and cooking and every time I come and visit she makes a cake or dessert but also makes some Donauwelle, just cause my sister and I love it very much. Normally, I don’t like cherries in cakes, but this is a big expectation.

Preparation time: 30 minutes
Baking time: 30 minutes
Difficulty level: simple

Ingredients
200 g sugar
250 g margarine
6 eggs
400 g flour
2 tsp baking powder
a pinch of salt
1 tsp vanilla extract
50 g cocoa powder
40 mL of milk

300 g cherries (I bought pitted cherries in a can)

Buttercream
1 Pkg. vanilla pudding powder
500 mL milk
250 g butter
50 g icing sugar

Chocolate glace
250 g dark chocolate
1 tsp oil

The first thing you got to do is to make the vanilla pudding. Vanilla pudding is an actual dessert in Germany, not like in the UK where they call desserts also pudding. The consistency is similar to custard.
2016-03-10 07_Fotor1
Off the 500 mL milk, add about 50 mL to the pudding powder and stir until the pudding powder is dissolved.
2016-03-10 07_Fotor2
Bring the rest of the milk to boil and stir while adding the dissolved pudding powder. Bring it back to boil for 1 minute and take off the heat.
2016-03-10 07_Fotor3
Leave to completely cool down and occasionally stir the mixture to prevent a skin to form on top. Put the butter next to the pot and allow to them to both reach room temperature.
Preheat the oven to 180 °C.
In the mean time, move on to the vanilla and chocolate sponge. Mix the sugar and margarine together and then add the eggs one by one while continues stirring. In a separate bowl, weigh out the flour, baking powder and salt and then add to the butter-sugar mixture in portions. Stir in the vanilla extract.
2016-03-10 18_Fotor6
Then take half of the dough and spread in a rectangular baking tin (covered in baking paper).
2016-03-10 19_Fotor9
Take the rest of the dough and add cocoa powder and milk.
2016-03-10 19_Fotor10
Stir well again. Now spread on top of the vanilla dough.
2016-03-10 19_Fotor7
Lastly, take the cherries and gently push into the dough.
2016-03-10 19_Fotor8
Put in the oven and bake for 30 minutes, check if any dough still sticks on the a dough tester after 30 minutes. Then allow to completely cool.

Once the pudding is cooled to room temperature you can make the butter cream. Start mixing the butter and add the icing sugar, then add the pudding little by little and continue mixing. And now taste it, it is always important to taste the butter cream (just cause it is so very delicious).

Once the cake is cooled, make sure it is completely cool, because otherwise the butter cream will melt away. Then spread the butter cream on top of the cake.


Then melt the chocolate over a water bath and add a little bit oil. Spread ontop of the butter cream and allow to cool.


The important thing is that once the chocolate starts to get harder, make sure to cut along the chocolate so that the next morning you just have to cut through the cake and won’t destroy the chocolate topping.
2016-03-11 06_Fotor17
Et voila, Donauwelle is ready to be served. Everyone who tried this cake was completely amazed so I hope you get the same reaction.

Simple New York Cheesecake

The last two months have just been crazy busy. Lab work has been keeping me rather busy and at the same time everyone’s birthday seems to be happening in January and February. I obviously couldn’t not not bake, but it also kept me even more busy. So when it got to the stage of having two birthdays on consecutive days, I decided I had to bake more time efficient (yes, that is so very German of me- I know). So, I made a massive KitKat cake (the blog for that will follow soon) and also wanted to make a New York Cheesecake. So I know that cheesecakes can be a bit of effort and taking very long to bake and require to be baked under steam (ie. sit in a water bath while baking) and all of that. However, as this sounded all rather tedious and not time efficient I found this other recipe that I slightly modified from bcc food that seemed like a pretty simple cheesecake. I was a bit worried, that if I rush this and take the easiest recipe, it wouldn’t turn out great, but I need to admit, this turned out to be one of the best cheesecakes I have made so far.

The major change I made is to incorporate some chocolate to the cheesecake by adding nutella to the cookie base.

Preparation time: 30 minutes
Baking time: 50 minutes
Difficulty level: simple

Ingredients:

200 g digestive biscuits
90 g butter

150 g nutella
900 g cream cheese (full-fat)
200 g sugar
200 mL sour cream
50 g flour
4 eggs
2 tsp vanilla extract

At first, add the digestive cookies into a plastic sealable bag. Seal it and then use a rolling pin in order to crush the cookies into really small pieces (actually probably more into a powder, floury consistency).


Then put in a blow. Melt the butter and the nutella together in a frying pan, the reason we warm up the nutella is that it makes it SO much easier to then mix with the cookies bits.


Add to the cookies and mix well. Then prepare a round baking tin, line it with baking paper (for cheesecakes with a cookie base I always feel like baking paper is better than just using butter and flour to grease the tin). Then add the cookie mixture to the baking tin and make sure you also press it against the wall as well as pressing it against the bottom. I quite like having the sides also covered in cookie base but if you don’t want to do that, just use 125 g digestive cookies.
2016-02-20 16_Fotor5
Now bake in the oven at 180 °C for 15 minutes and allow to cool. In that time, you can prepare the cream cheese filling.
It is very simple and straight forward. Add the cream cheese to a bowl, add the sugar and vanilla extract and a pinch of salt.
2016-02-20 16_Fotor6
Mix well. Then add the sour cream and 2 eggs at a time. Make sure you beat well and get a few air bubbles (but not too many as this might make it difficult to get a smooth surface later when baking). Then add the flour and quickly stir together. Now pour into the baking tin, when the cookie base has been cooled down.
2016-02-20 16_Fotor7
Bake at 160 °C for another 50 minutes. You do not need to cover the baking tin with kitchen foil nor do you require a water bath.

It always seems difficult to get the surface of the cheesecake without any cracks (especially the German cheesecake I introduced earlier in my blog). So the two things I normally do is, firstly using baking paper cause if the cake collapses slightly the baking paper will move with it and preventing cracks and secondly is to turn off the oven and leave the cake in there to allow it to slowly cool down. It worked very very well for this cheesecake and I did not get any cracks!
2016-02-22 08_Fotor
Then just remove from the baking tray. It is best stored in the fridge or a colder room in your house. Serve it with a simple chocolate sauce or straight up like this.

Enjoy!